Friday, April 29, 2011

A good excuse to stay in (Breakfast Pizza)


This pizza base recipe will mean that you will never want to go out for pizza again! Well, maybe not never - you might be too lazy to cook or you might live around the corner from an amazing pizza shop, for example, in Naples or Leichhardt.

However, this puts your home-made pizza into a different league - thin, crispy, puffy base.

The one rule is - do not overload your pizza with topping - eventhough you may be tempted - the base will not crisp up.

This recipe shows how to make it the night before  but you can use it the same night as well...

Makes 8 small and 4 large pizzas - you can keep the remaining dough in the fridge for up to 3 days.

Ingredients

Base

700ml White Bread Flour (I like to replace 200ml of the bread flour for 200mL semolina if I have it handy - it makes a crispier crust)
1 tsp salt
2 tsp Instant yeast
1-2 tbsp olive oil

Tomato Base

1 small 50g can tomato paste
1 tablespoon olive oil
1 clove garlic
1-2 teaspoons ready made pesto (if you have in the fridge or freezer) or 1 teaspoon dried italian herbs
Salt and pepper


Toppings
Black forest ham
Olives
Peppadews
Grated cheese
Feta (crumbled)
Eggs


Put all the Base ingredients into the bowl of your mixer and attach the dough hook


Start to mix with a dough hook. Add up to 1-1 1/2 cups more lukewarm water
until the dough comes together and pulls away from the side of the mixer. Mix for a further 5 min until the dough is smooth and supple.

This is not supple.....


This is supple (notice the smooth surface when you stretch the dough).


[If you don't have a dough hook mix by hand until the ingredients form a dough. Turn out onto a clean surface and knead until the dough is supple]


Form into a large ball. Drop a little olive oil on the surface and then spread over the surface of the bowl.


Cover loosely with clingfilm or an upside down plate and place in the
fridge overnight.


[If you want to use it the same night, cover with a tea towel damp with warm water and place in your oven. Switch the oven on as low as possible - no more than 50 degrees for 1-1 1/2 hours until doubled in size]


The next morning, (or after it has risen) shape into balls and let rest with some clingfilm loosely over it for 20-30 min in a reasonably warm place. While the dough is resting, preheat the oven to as high as it goes(250 or above) with an upside down baking sheet(or a pizza stone if you are lucky enough to have one) inside as it is heating up. This is essential.

[Be warned - if the oven is not very hot or you don't leave the baking tray inside, the pizza base will not puff up nicely]


Notice that the dough goes a bit puffy - this is good.


 Place some flour on a clean counter and flour your rolling pin (or a clean empty wine bottle). Roll out the dough to about 2-4mm thickness.


Place on a lightly oiled sheet of aluminum foil.


Mix together the ingredients for the tomato base.


Use a brush or the back of a spoon to spread a thin layer over the base.


 Add your toppings - remember less is more.

Perhaps some black forest ham


Olives -you should pit and slice these...


Peppadews....or roast red peppers

 Crumble some fetta


And some grated cheese


Et voila


Fold the edges of the foil up slightly to stop any run away eggs.

Once the oven is hot, open it and put the pizza and aluminum foil straight onto the baking tray in the oven. Crack an egg carefully on top of the pizza. Close the oven as quickly as possible.


 Watch the pizza bubble up nicely. Remove when edges are slightly brown.
  
Repeat with remaining dough.


[If you run out of toppings you can brush with olive oil, garlic, salt, pepper and italian herbs]

Wednesday, April 20, 2011

Bachelor Food (Bacon and cottage cheese pasta)


This is a recipe which my parents cooked often during my childhood. It evolved from a Hungarian dish but doubt that my Hungarian cousins will even recognise this.

The Hungarian version uses a different sort of cheese - called túró - which is much drier and finer. And instead of bacon, bacon fat.The pasta can be homemade, or often flat square noodles are used.
 
But growing up in an English speaking country - this is the closest you can get to this dish. I like it because it is a bit like a creamy pasta - but much healthier and less rich. And so simple that the Photographer can make it without written instructions!

This recipe makes two bachelor sized portions.

Ingredients

200g dried pasta
250g low fat cottage cheese
125g (3-4 pieces) bacon* - chopped
2 tablespoons parsley**- chopped  (optional)
Salt and pepper

*[If you are health conscious, use back bacon and cut off the fat. If you are semi health conscious cut off the fat and fry it in the pan with the bacon meat but pick it out the pieces but throw away before you serve. If you are not health conscious at all eat the bacon fat - it is very yummy fried crispy]

**[I usually buy a big bunch and chop it all at once. Then I put in a ziplock bag in the freezer and use as required]

Cook the pasta:
Pour some water into a medium pot so the water covers the bottom. Place it on high heat on the stove. Fill the kettle with water and allow to boil. Once boiled, pour the water into the pot. Once the water is gently boiling, add the pasta. Cook until the pasta is soft but still firm when you take a bite. Drain in a colander and return to the pot until you are ready to add to the bacon.

In the meantime, put a frying pan on med-high heat. Add the bacon and fry until crispy. 


Add the cooked pasta to the pan.


Add the cottage cheese.


Salt and pepper....


....and parsley....mix....  

And serve.

Wednesday, April 13, 2011

Milk and (Chocolate, Pecan and Cranberry Cookies)


I started making chocolate chip cookies because I love eating cookie dough. That is still why I make them. When I am finished eating enough cookie dough to get a bellyache, I bake what's left of the dough and give to friends or take to work....

These are not chocolate chip cookies but close enough. To turn them into choc chip cookies, use dark or white choc-chips instead of cranberries....or smarties ....or mini m&ms. If you want a white cookie, omit the the cocoa and substitute for the same amount of flour.
Makes about 24 cookies (about 3-4cm in diameter)

[This recipe was adapted from the Women's Weekly Creative Food Series: Picnics]

Ingredients

1 cup (200g) firmly packed brown sugar
1/2 cup (110g) caster sugar
230g plain flour
70g cocoa
1 teaspoon baking powder
1 teaspoon salt
185g butter, soft
2 large eggs
1 teaspoon vanilla extract or essence
80g dried cranberries
100g pecans

Preheat the oven to 180ºC

In a mixing bowl:

Cream the butter.
 

 Add the sugar


Add the eggs and cream until light and fluffy.


Add the flourMix on medium speed until just combined - do not overmix.
 

 Roughly chop the pecans.


Add the pecans and cranberries to the dough. Mix until the nuts and cranberries are evenly distributed in the dough.
 

Prepare a baking tray with baking paper. If you have two trays, prepare two, otherwise cut an extra piece of baking paper the same size and lay on the counter.

There are two ways to make the cookies from here. The first is to take heaped teaspoons of cookie dough and put them onto the baking tray (leaving about 2-3cm between each mound). Although this works well, I am usually patient enough the check the size of my heaped teaspoons and end up with really irregular cookies.

This is a slightly more messy way to do things but I find I end up with more regular looking cookies.

Take half the cookie dough and place it on the counter. Roll (if possible) or, if the dough is too soft, shape the dough into a long sausage about 2cm in diameter.


Cut with a sharp knife into 1cm wide pieces.


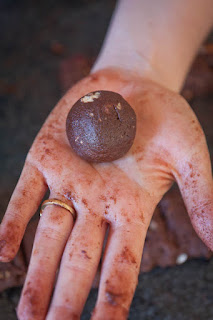
Take each piece


Roll into a ball.
 

 And flatten between your palms. 


 Place on the prepared baking tray.
 

Bake in the middle of the preheated oven for 18 minutes. The surface should start to crack a bit.


 Leave to cool for 5 minutes on the tray and then place onto on a baking rack to cool further.


If you only have one baking tray, once you have removed the cookies, run the tray until cold water until the surface is cool to touch. Transfer the second baking sheet with your second batch of cookies onto the tray and place in the oven.

And while you are waiting for the second batch to come out, you might need to try a cookie or three, just to see if they are ok.......


Once the biscuits are cold, store in an airtight container.